or "How to stretch a canvas".. [ next part | tutorials home ]
Step 1: Four stretcher bars feat. beveled top* and proper precision machine-mitred joints (bought off TradeMe). Look for warp-resistant timber, untreated (un-Tanalised), degreased, and kiln dried.
A quick note about size: I wouldn't go too large on the dimension front. This method does not involve cross-beam supports, and I would be hesitant to go much above 50cm before I started worrying about warp / bowing along the timber grain because of the tension of the stretched canvas. On the other hand, if you do go larger, you might get away with it if you stretch the canvas only very gently (more on that later.)
Step 2: Using as little force as possible, assemble. If you don't have a mallet then use a wood-block and a hammer to knock the joints together -- the wood-block is to prevent damage to the stretcher bars.
Step 3: Get the corners as flush as possible. Use measuring tape to confirm that the knocked-together dimensions are what you expect them to be -- in this case, all four edges the same. Also measure the diagonals -- they need to be the same measurement otherwise the stretcher is out of 'square'.
Step 4: lay out your canvas. 10oz cotton duck is the go; 12oz is even better but harder to stretch -- this is not a problem though if you have canvas pliers and / or strong hands. Allow up to 100mm overlap plus the depth of the stretcher bars -- in this case 30mm. Lightly draw in pencil and then cut.
Step 5: Et voila! If you have a square, then check your angles are 90 degrees. Nobody likes a rhombus (in this case) or a trapezoid or parallelogram (rectangle) -- I mean, unless that's what you're going for. If they're not 90 deg, or if your side lengths are not correct, or if your diagonals are not equidistant then you're going to have to go through the annoying process of knocking one or more of the joints back out by very small amounts. Hammer, wood-block, swearing..
Here endeth the lesson because I can't find my staples. Part 2 follows.
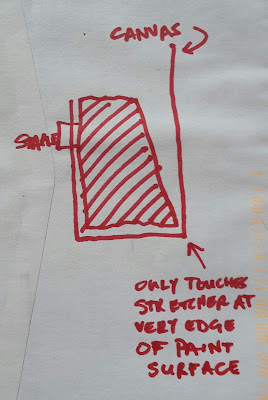
* "Why bevelled top?" I hear you ask. This is why:
(That noise you just heard was my college technical drawing teacher turning over in his grave.)


No comments:
Post a Comment